Sunday, August 21, 2016

Karma

It took me all summer, but my Jennifer Show donation is finally on its way to Colorado.


Today I leave for college 2,851 miles away from home. This summer has been loaded with prep for this, and light on tack making; the dressage set came together over countless little hour and half hour long sessions here and there instead of dedicated studio days.


While this sluggish work pace was frustrating, my belief in the idea of karma kept me motivated. Jennifer Buxton's blog was one of my first introductions to the hobby as a little kid, and her tack was definitely one of the main inspirations behind me trying tack making myself.


Jennifer puts an insane amount of time and thought and love into her blog, providing a near daily dose of hobby goodness, and I just had to spring at the opportunity to say thank you.


I'd already been yearning to try an upper level dressage set for the new Valegro mold, and the donation opportunity seemed like a worthy cause for such a frustrating intricate set. 


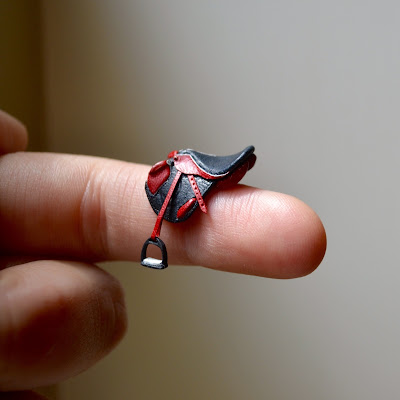
The saddle is particularly adventurous, using entirely new patterns, a hand-sculpted tree (as opposed to my typical soda can structure), and...


...actual sweat flaps!


This is my first and probably last ever saddle to have multi-layered flaps, but I really wanted to try out a double layer knee block design. I have to say I'm really pleased with the result. 


As with all experimental saddles, I can see things I'll change for next time, but I think overall it's pretty snazzy!


Seeing as the Jennifer Show sounds like THE hobby show of the year, it seemed only fitting to throw together a champion prize-style blanket to go with.


This is actually my first ever attempt at a blanket (beyond my very stylish felt and scotch tape ones with which I outfitted my herd as a kid), and I had a blast putting it together!


The burgundy color (which also lines the inside of the dressage pad) was inspired by the letter shadowing in the show's amazing logo:


The lettering is all hand-painted with the tiniest brush you could possibly imagine, and the hooks are all handmade and functional, which I'm honestly quite proud of!


The OF Valegro went along with the tack and blanket as well, because I somehow have accumulated four of them someone needed to model my foray into blanket making!

Despite attending an art school, I made the decision to leave my tack making stuff at home, making this my last set for the foreseeable future. I'm shifting my focus to my other art and the whole going to college thing, so the blog is going to be a little quiet for a while. It honestly feels a bit like the end of an era, and I am so glad to have been able to make my last set one that means so much to me.

I'm sure the Jennifer Show will be an absolute blast, and I can't wait to read all of Jennifer's reports! Good luck to all the entrants and both Jennifer hostesses, and thank you to absolutely everyone who has supported me in my hobby journey thus far. The skills and inspirations I've gathered in this hobby have made me the artist I am today, and I know they'll continue to help me in whatever future endeavors lie in wait. 


:)


Saturday, June 25, 2016

Devoucoux Eventing Set

All eventing sets take a lot of time and work, but this one had more uphill struggles than most- which makes finishing it that much more gratifying!


This saddle has been in the back of my mind for ages and ages now and I'm so happy to have it be a reality. I love me a good clean dark brown hunter set, but sets like this with fun colors and details (despite requiring extra elbow grease) feel so special and unique. 


I'm also just crazy pleased with the overall sleekness and cleanness of this set- the cowhide really looks quality, and the painted pieces are clean and tidy. 


The pictures don't show it well at all, but the browband actually has little red dots to tie in with the saddle.


This set was a real labor of love, and I can't wait for it to make someone else as happy as it makes me! 

(It's up for sale on MH$P here!)

Monday, June 13, 2016

Studio Update: June 13

It's taken me since March, but this somewhat ridiculous, somewhat awesome saddle is finally finished and getting all the bells and whistles and accessories to go with.


Which has thrown my desk into that old familiar "there's so many tiny pieces of leather but I don't know which ones I can use and which are trash" mess.


The breastplate I've been putting off for days got a start today, though only so far as the alien baby stages:


Most of my time went into finishing up the funky short girth and figure eight bridle.


It's super easy for me to forget how long eventing sets actually take, considering all the bits and pieces- I feel like I've been fiddling with this set forever and I still have the rest of the breastplate and four boots to go!


I'm crazy motivated to get this set done firstly because I think it's going to look really special and I'm pumped to see it all come together, and secondly because I'm making myself finish this project before I start the next exciting thing I have waiting!

But for now, it's back to the breastplate. (Sigh).

Sunday, June 12, 2016

Evolution of the Saddle Pad

There was a time when I literally made saddle pads out of paper towels.

This one is actually just cut from an old sock- classy!

As in, rip off a paper towel, cut into rectangular shape, slap it under a saddle and call it a day. Honestly, I don't even think they looked too bad. I mean, they could never get wet or be handled more than maybe twice, but they looked okay. It took me a good two years of experimenting to move on to another thin, textured fabric: aida cloth.


Intended for use in embroidery and cross stitching projects, aida cloth is a somewhat stiff, uniform weave fabric in a grid perfect for 1:32 scale quilting. Most of my 2014 saddles came with simple aida pads, which even at the time felt lazy, but pads were very much an afterthought for me and they got the job done. 


The open weave makes the fabric pretty transparent on its own, somewhat detracting from the quilted illusion. It eventually started to bug me that my pads were simply shapes cut from fancy fabric, and I stepped it up with cotton linings and hand-embroidered borders:


While this was definitely an improvement and looked much more intentional and loved than the previous version, the embroidery (while cute) seemed out of scale.


I've recently been bugged by how the stiffness of the aida makes the pad sit straight across from the withers to hips instead of conforming to the slope of the back. This is much less noticeable under a saddle than with the surcingle set above, but it does make the saddle sit a bit higher off the horse.


Today I should've been working on a five-point breastplate for my current eventing set, but instead I spent a good few hours playing around and making the next iteration of saddle pad:


One that's actually shaped like a saddle pad! I finally have a two-part pattern that allows for a much closer fit along the top line- that and a super neat new method of doing the trim (you can hardly tell in the pics, but there's a fine black border around the outer edges) make me a very happy tack maker. 


I would love to add the straps for the girth to be threaded through as well as a grab strap on the withers, but I'm stuck on finding a fabric/ribbon to mimic that nylon texture in this scale! Those are the kinds of details that make me happy but realistically hardly even show up after the set is all tacked up, so they're not a priority, but it would be adorable.


One of my past drawing teachers used to constantly tell us to give as much "love" to the background of our drawings as we did the foreground, pointing out many a piece with beautifully executed subjects and lazily scribbled shadows in the back. I feel like pads are easy to see as the "background" of the saddle, the less important piece, but when they're given a bit of love and attention, they can really bring that next level of sharpness to a set. 

(Writing this post was definitely not just further procrastination on that breastplate.)


Saturday, June 4, 2016

Halter Time

I've been in a bit of a tack making funk. 

As in, it's summer, I have free time, I'm well stocked on supplies, and yet whenever I sit down to make tack I end up finding ways of not actually getting anything done.


So I've been making halters.


I don't even know how badly people out there want halters, but they're fun to make, don't take up too much time, and make me feel good for finishing something.


I broke out the leather paint for this one, which was a fun little experiment. It came together during a binge watch of That 70's Show, and I think some kind of groovy vibe came through. 


My smallest paint brush was too clumsy, so I opted for using the tip of a sewing needle to paint. I doubt I'll be repeating this process anytime soon, but I like the end result!


I usually use a slip buckle on halters that requires actual buckling to get on and off (as in the black halter at the top of this post), but with that method I always miss the realism of the buckle's tongue. At the same time, I'm not about to make anyone actually operate a tongue buckle at this scale, so I came up with a little cheat:


The buckled buckle just sticky waxes down! Any piece of Stablemate tack that doesn't require the threading of straps through buckles is a winner in my books.

(The painted halter is up for grabs on MH$P here!)


Thursday, March 24, 2016

Studio Update: March 24

I feel like I've been so productive, and yet I'm struggling to find photo evidence.

Basically, I've been in a very cross country-type mood lately, judging by my current projects. There's this micro diorama, kind of a sequel to last year's version:


I have a massive reference folder of fences and obstacles from the London 2012 Olympics, and this guy has been near the top for years now.


It's still very much in the rough stages, and I have a whole 'nother post coming together about the process of this project, but it's been fun so far!

The other time-suck on my desk is also of the eventing variety, and also a project I've been itching to tackle for years now: this awesomely tacky Devoucoux saddle from a Braymere post a while back. 


The wrinkled skirt has since been replaced- sigh!

I bought myself some high-quality leather paints for a racing set a few years ago and haven't really had the chance to use them since. So far with this saddle I've been really pleased with the paint, and all the touching and handling involved in assembling it hasn't seemed to phase the painted pieces. I do have some anxiety about paint flaking off or chipping away, but *knock on wood* so far so good!

I'm off to make some very red panels!

Thursday, March 17, 2016

The Thick of It

I don't know how many English sets I've made in my "career" so far. If I had to guess, I'd say somewhere between a good few and a bunch.


What made this week's set different than the past many, is the fact that it's made entirely from 3mm tooling cowhide. 

Here's a thickness comparison reference for you:


The cowhide is easily double the thickness of my normal leather, skiver, which still needs to be skived down quite a bit to be usable for mini scale tack. Using this super chunky stuff meant at least double the skiving time on every. Single. Piece.


Grace, you ask, if it takes forever to make usable, why use the thick leather in the first place?

Good question.

While there's nothing especially wrong with my skiver, I've been looking for a leather with a smaller grain for a long while now. 

Skiver saddle, sometime in 2015

Cowhide saddle, circa today

Besides the more discreet grain, this thicker leather also has a bit more body to it, which makes all the little tiny straps and whatnot feel slightly less fragile.


It's also much better at holding little details like stitch marks, and I like its overall well-oiled, quality kind of look.


The added prep work time means charging more for cowhide sets than skiver ones, which I don't love. My prices are slowly increasing over the years as the quality of my tack increases (I hope!), and I do my best to be fair to myself and my customers, but pricing is still super tricky for me. 


At this point, I really like the cowhide and I'm not sure if this is a full transition away from skiver or just a fun departure. I feel like the big skiver grain will bug me much more now that I have a better alternative...


I was really pleased with how these boots came out! The new leather definitely molds to the leg better and holds a nice shape.


And of course, what pad color could I possible choose on St. Patrick's Day but spring green?


For this set, I aimed for a good kind of starter English package to cover jumper, hunter, and your trail/games/other classes in the English division. I figured as I'm not currently taking commissions, it'd be convenient to offer a full package kind of deal instead of leaving someone wanting for boots or a breastplate or something. 


Having done a few basic/general purpose sets back to back, I'm really itching to try something a bit different next. I'm thinking some crazy eventing set or something?


Any other tackmakers out there, I'd be interested in any leather suggestions that might split the difference between the cowhide and skiver- thinner than cowhide with tighter grain than skiver?

(Update: this set is now up for grabs on MH$P here!)